IT Infrastructure
I was asked to design a solid IT architecture for a small consulting firm. In the article on Computing Infrastructures we already covered something similar but related to large infrastructures. Here I will instead focus on a deep dive into the design of small systems.
The specific case
We want to understand how to size a system that must host 4 workstations. A high-level diagram of the architecture could be the following:
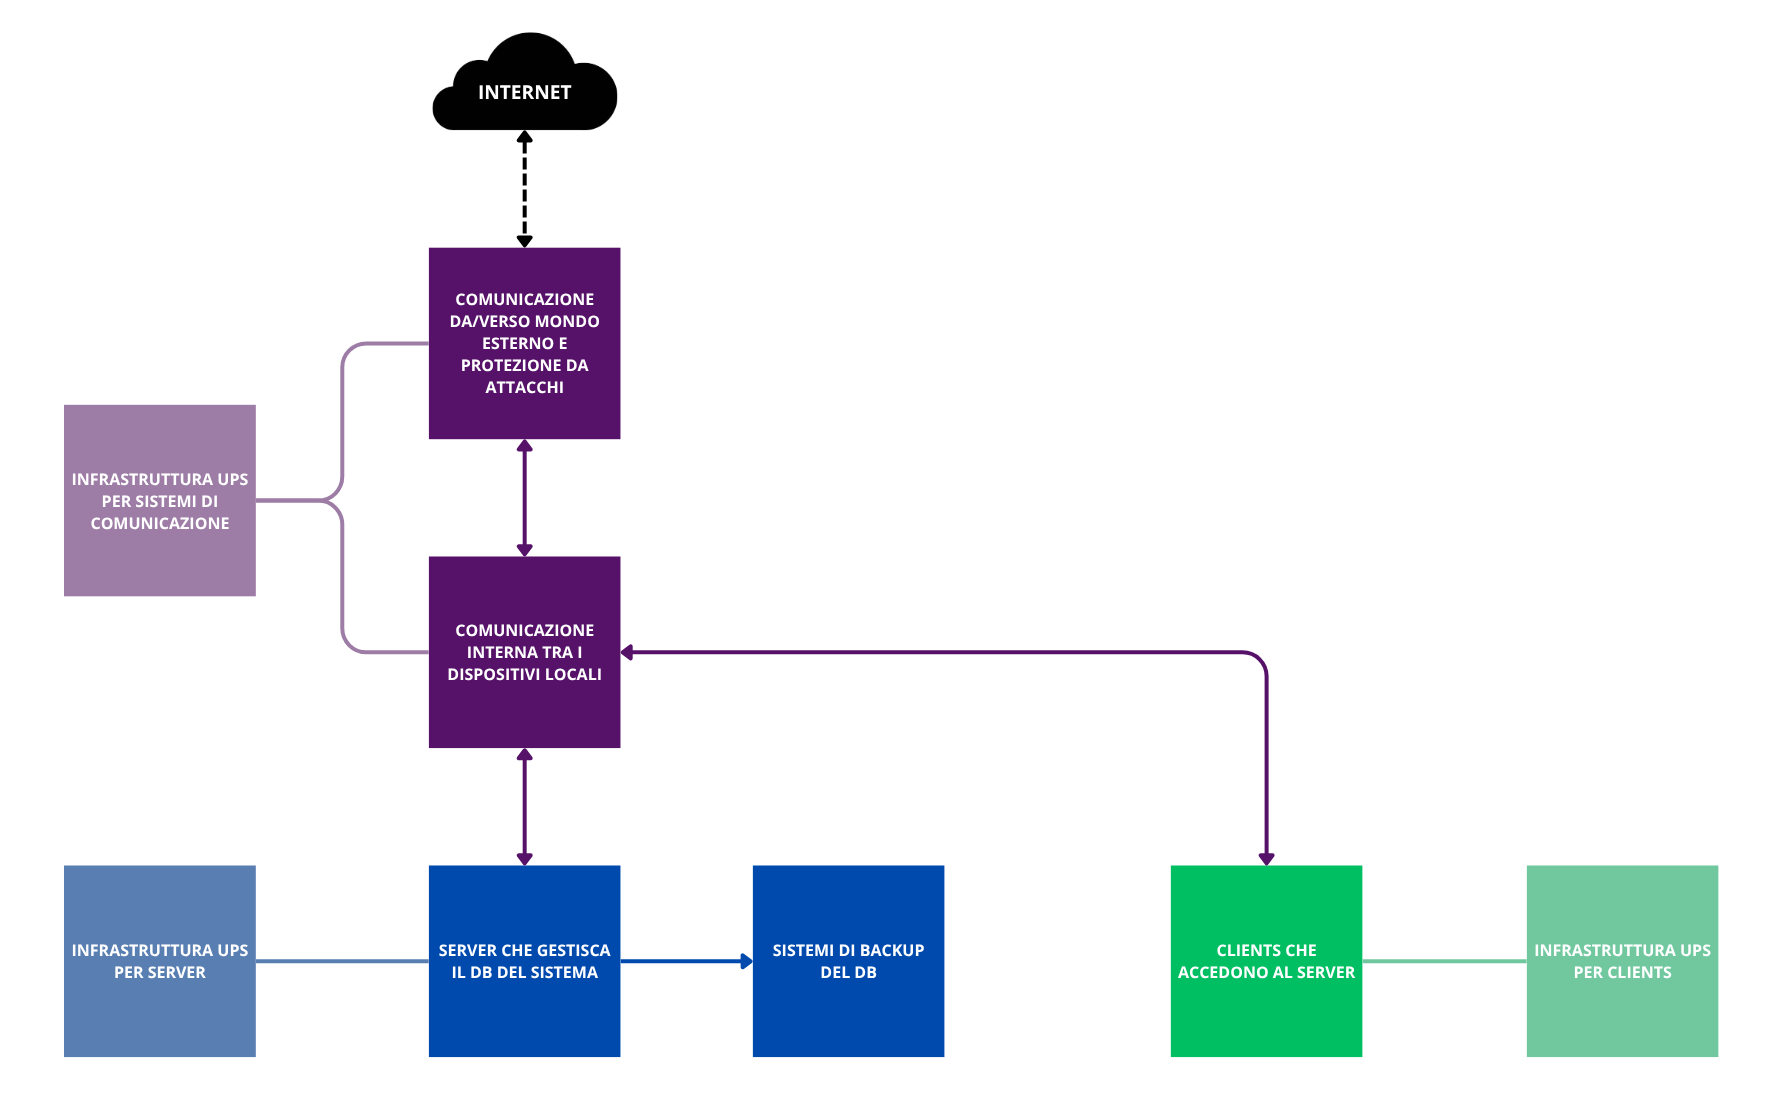
In the next chapters we will analyze the various sections one by one, to choose what to practically use in this diagram.
The server
A server is a “computer” with characteristics that make it more suitable for specific use cases. In some circumstances it may be more convenient to use a simple consumer computer and assign it the role of server instead of using a real server. To understand whether this is the case, let’s analyze the differences between the two devices.
CPU structure
The CPU (the processor) is the brain of the computer, the place where we imagine (and it is true) that the magic of digital computation happens. What often does not belong to our mental picture is that on the silicon surface that hosts this component, only a small part is intended for the actual computing elements, while the vast majority of the space is occupied by other resources. Let’s therefore analyze the sections that make up a processor, so we can understand whether there are differences between processors for consumer computers and those for servers.
The Core Complex
This is the chip section related to computation. In practice it is composed of a module (core) repeated \(N\) times (e.g. 4 for a quad-core CPU). Each of these cores is made of:
- the ALU (Arithmetic Logic Unit), meaning the actual computing center;
- the L1 and L2 caches: the fastest memories in the machine. Following the principle “the faster the memory, the closer it is to the computing units, the higher its cost and the smaller its capacity”, these caches are very small and very expensive. L1 caches are often glued to the ALUs and have limited capacity to hold only the data you are operating on in the current nanosecond (e.g. the number in an Excel cell), L2 caches belong to each core, are a bit larger and a bit slower (they could, for example, be used to store the Excel sheet you are working on);
- a front end that reads instructions and handles branch prediction (that is: if the core encounters an if(…), and the condition has already been encountered many times and always had the same value, it is “bet” that the value will be the same this time too, and the preparatory operations for the calculations of the corresponding branch are carried out. If the bet then turns out to be correct, we have saved several clock cycles. If it turns out to be wrong, we must restart with the calculations of the other branch. It is useful when performing repetitive operations, not ideal in more varied tasks).
The cores then share a larger and slower cache, called L3, which is the last SRAM memory (Static Random Access Memory, faster and more expensive than classic DRAM, which in informal language we call “RAM”) before moving to DRAM. Shared data among different cores is placed here.
Internal communication among components
The internal components of the chip are interconnected to allow communication. Leaving aside the technical details of how this happens, we can distinguish two types of approaches:
- ring bus: there is a single bus, and data is all sent to and received from it. It is ok when cores are few, but it can generate excessively long queues if the number of cores increases a lot.
- direct connection: components are connected in some direct way (e.g. a mesh approach), so that communication latency is deterministic.
Communication between CPU and the outside world
The previous modules are placed inside the rectangle that makes up the chip. Along the edges, instead, are placed the interfaces for communication with the outside. Their location is not just a convention, it is a technical necessity: signals inside the processor are digital and operate at very low voltages (e.g. 0.8V). To go outside, you need “converters” placed near the pins with which the chip connects to the motherboard (therefore placed on the edge) that amplify the signal and make it resistant to interference from the outside world (motherboard circuits behave like an antenna). Operating at higher voltages, these elements heat up, another reason why it is convenient to place them on the outer part of the chip, “far” from the cores.
The types of devices toward which the CPU needs communication channels are two:
- DRAM;
- other devices (e.g. video cards, storage disks, RAID controllers,…).
Communication with DRAM
As for Dynamic RAM, it is controlled by the CPU’s Integrated Memory Controller (IMC). However, DRAM behaves electrically like a capacitor and therefore applies a delay to the rising and falling edges of the signal. Remembering that the time a capacitor discharges is \(\tau=R_\text{eq}*C\), where C is proportional to the number of RAM banks inserted, we realize that there is a physical limit to the amount of RAM that can be directly connected to the CPU. A solution is to use DRAM equipped with RDIMM, where there is an additional module (R = register) that lowers the capacitance imposed by DRAM on the processor.
Communication with other devices
Other devices are connected via PCIe, whose iterations differ by:
- number of lanes: it is the fundamental unit of PCIe, made of a pair of outgoing channels and a pair of incoming channels. This allows the CPU to receive data from one component while it is sending information to another. The architecture can then be scaled using more lanes depending on the bandwidth needs of the component (e.g. PCIeX1 for WiFi or sound cards, PCIeX4 for NVMe SSDs, PCIeX8 for RAID controllers, PCIeX16 for GPUs).
- generation: several generations of PCIe have followed, each allowing higher per-lane performance than the previous version.
The PCIe interface suffers from two problems:
- communication modules on the CPU need space on the edges, but increasing the length of the edges linearly increases the area quadratically. This means that to have a wide PCIe bandwidth it is necessary to use very large chips even if the computational units and cache do not increase.
- the signal degrades easily over “long” distances: on the motherboards of the computers we commonly use, data can become unreadable already after 2 cm. It is therefore necessary to use very short traces to connect devices to the CPU or, if you want to connect more distant devices, use more suitable (and expensive) materials for the motherboard or install repeaters that clean and amplify (actively or passively) the signal along the trace as it degrades.
Differences between a consumer computer and a server
This huge preamble was necessary to understand the differences we will see below and to consciously choose the device suitable for the case under analysis.
I will now write a bulleted list whose items represent the components analyzed above, briefly explaining the approach used by servers and consumer computers.
- Core Complex: the consumer computer focuses everything on single-core power. ALUs must be able to handle heavy loads, user programs must run fast. A server often has worse single-core performance, but distributes the load across more cores.
- Intra-CPU connections: precisely because of the higher number of cores, in a server it is necessary to use a point-to-point intra-CPU connection approach, to make communication latency deterministic.
- L3 cache: it is much larger on server CPUs than on consumer ones.
- Communication toward RAM: on consumer devices, the amount of insertable DRAM is often limited by the physical constraints cited above. On servers, RDIMM support allows supporting a larger amount of DRAM.
- Communication between CPU and the outside world: servers use large CPUs, so that the chip “edges” are spacious. In this way it is possible to place many PCIe communication traces and have direct high-bandwidth connections to external components. In addition, thanks both to the specific materials used for the motherboard and to the adoption of the signal repeaters mentioned above, it is possible to place components at great distance from the CPU. Conversely, consumer computers have limited PCIe lanes and very close to the CPU (e.g. only for NVMe and GPU). The rest of the components are (in Intel’s case) connected through an interface called DMI (Direct Media Interface), which is nothing more than a shared PCIe for all other devices (with the resulting risk of oversubscription).
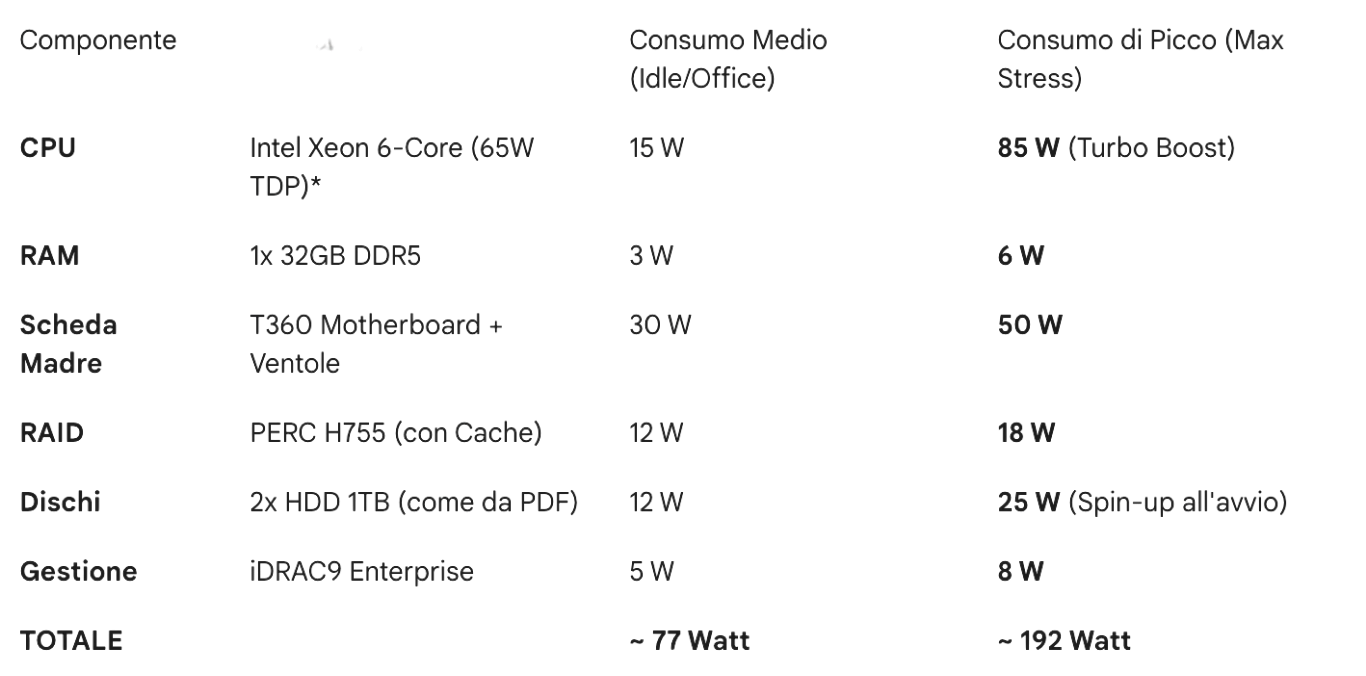
In our case, the server probably needs to support a RAID controller, handle the network traffic of 4 simultaneous users, and guarantee the integrity of stored data.
For 4 workstations doing office activities (documents, management software, browsing, email), the pure computing power (CPU) required by the server is marginal. Any modern consumer processor (e.g. an i5 or Ryzen 5) would have machine cycles to spare.
However, the real workload in this scenario is not computational, but Input/Output (I/O) and data integrity. Let’s imagine the critical scenario: at 9:00 in the morning, 4 users turn on their PCs, the backup system is finishing the nightly synchronization, and two consultants are saving large files to the server.
- Consumer scenario: if we used an adapted PC, all this traffic (Network + Disks + USB backup) would converge on the DMI interface. As seen, it acts as a “funnel”. The risk is not that the server freezes, but that latency skyrockets, making opening a simple Word file exasperating for users, even though the CPU is idle.
- Server scenario: using a CPU with many direct PCIe lanes, we can connect the network card and disk controller directly to the processor. Each will have its own dedicated lane, ensuring smoothness even under simultaneous load.
Other reasons that tip the balance toward choosing a server are support for ECC memory (Error Correction Code. I went deeper into these topics in the System Security course at the university of Poznań, I will probably write a review article) and the presence of remote access components, which allow managing server crashes or malfunctions even if the technician is not physically present in the office.
Final choice: server.
OS management and storage
On a server it is a good thing to improve reliability (in terms of availability) through data redundancy. I will not explain here what RAID is and what types are possible, since I already did it here.
For the system in question, I think it is a good choice to stick to simple options, so I would choose RAID 1 on two identical disks.
I asked the oracle (Google’s Gemini) to search for a modern server that met the characteristics written in the previous chapter. I was redirected to this link, where I found myself in front of a myriad of possible configuration choices. Among these, the ones related to data redundancy are two:
- RAID connectivity, with the possibility to choose RAID1. The server in the link (a DELL PowerEdge T360) has 8 HHD/SSD bays accessible from the front slots, and duplication would be performed on them (in groups of N disks, configurable).
- Boot Optimized Storage Solutions, with the possibility to buy a “BOSS-N1 controller”. I looked into what it was, and it is basically a very expensive RAID1 (an additional 900€ on the DELL site), implemented in a proprietary card with two M.2 SSDs, dedicated only to the OS, to be inserted inside the server case (so as not to occupy externally accessible slots).
The options to choose from are therefore 3:
- We throw money away: if we do not care about price, we can make life simple by buying the BOSS module with the OS preinstalled. We would have all 8 front slots free for company data. But do we really need all these slots?
- Cheap and (too) simple option: we keep only RAID1, partition the disks into C: and D:, and rely only on the duplication performed by RAID. It is a convenient option, but we must always remember that Windows, whether Server, Home, or Pro, is awful. If during a software update the OS decides to delete the partition table or whatever, we can say goodbye to data too. Keeping the OS physically separate from the data could be a good long-term choice.
- Like mortadella (it costs little and tastes great): instead of preserving the front slots and then probably leaving them empty, we use them. The PERC H755 module allows creating multiple RAID1 arrays: we can use two 500GB SSDs in RAID1 for the OS, and two more 1 or 2 TB SSDs in RAID1 for data.
As you can guess, option 3 is the one I prefer in this case.
I recommend not buying the disks directly from the DELL site, because they are really overpriced, but to buy them separately.
The server calculations
Let’s do a final calculation of the server price.
- Disks for the OS: Samsung 870 EVO 500Gb, \(2*58\text{€}=116\text{€}\).
- Disks for data: Western Digital Blue 2 TB, \(2 * 146\text{€} = 292\text{€}\).
- Adapters for 2.5-inch disks: WORKDONE - 4 Caddy Hard Disk 3.5 Inch \(50\text{€}\)
- SERVER - Option 1: an excellent option would be to buy a PowerEdge T360 in this configuration, for \(2.657\text{€}\). The total server cost is therefore \(3.115\text{€}\);
- SERVER - Option 2: another possibility is to get a used T340, the model from two generations before the T360. Performance-wise it is still fine for our use case, but you must be careful to find a unit with a RAID module equipped with cache (the one in the link does not have it) or buy one and replace it. It seems like a small thing, but cache makes the user experience much better and avoids the formation of long queues of write operations. The server price in this case would be \(1.800\text{€}\), plus \(458\text{€}\) for disks and adapters and \(70\text{€}\) for the RAID + cache module H730P Mini Perc, for a total of \(2.328\text{€}\).
Connections in our architecture
Reviewing the notes from the Foundations of Internet and Networks course, we can rediscover that the OSI model divides IT networks into 7 layers. When a device sends data to another, this data is wrapped in several header layers, starting from the upper layer (innermost header) down to the lower one (outermost header). Along the route to the receiver, the data will be unpacked little by little to deliver the message.
The layers specifically are:
- Layers 5, 6, and 7 - App: born as distinct layers (Session, Presentation, Application), here I merge them because they are not directly useful for this discussion. It is the layer the user sees in their application and uses the most varied communication protocols.
- Layer 4 - Transport: when the application wants to send information outside the machine, it packages the data as TCP or UDP packets (there are other possibilities, I am simplifying). This is the transport layer.
- Layer 3 - Network: the TCP or UDP packet is then encapsulated in an IP packet, specifying the recipient’s IP address (it can be a PC in the same LAN or a device on the internet). This is the Router layer, the device that connects the office LAN to the outside world. Among the constraints given by the requester are high security and the ability to access the local network remotely; for this reason I chose a router with an excellent integrated firewall and a simple interface to configure features and VPNs (Dream Machine Pro).
- Layer 2 - Data Link: the IP packet is in turn enclosed in an Ethernet packet, containing the MAC address of the next node on the path to the destination. This node (e.g. the LAN Router) extracts the IP packet, reads the recipient IP address, decides which nearby node to send it to, and repackages it in a new Ethernet packet. This process continues until the destination is reached. The device that handles addressing among devices inside the LAN using their MACs is the switch. In the network in question we will have several devices (4 clients, the server, any printers and devices connected to the network) so it is important to have many ports and high bandwidth. Given the router choice, I decided to go with a Standard 24 PoE from the same brand, because I saw that this combination allows me to manage both Router and Switch from the same convenient admin dashboard.
- Layer 1 - Physical: it is the physical world underlying the upper layers. The cable we choose to transmit information inside the LAN (we will use CAT6) or the frequencies on which WiFi transmits (2.5 or 5 GHz) are part of this layer (the office is not very large, so as WiFi access points we will use two of these).
The data receiver will unpack it in the opposite direction, from layer 1 to 7.
The price of the “network” section is therefore \(340+340+2*150=980\text{€}\). The total so far is \(4.095\text{€}\).
As a security criterion, I will also propose segmenting the LAN into 3 subnets:
- the first for critical devices (Server and clients that should be reserved for work);
- the second for employee devices and any other devices (e.g. printers) that, due to potentially old or vulnerable software, could act as access points to sensitive data if connected to the same LAN;
- finally a subnet for clients, so that any infected devices cannot access the first two subnets.
Defenses against external attacks
There are mainly two points where we can install defense systems for our system: the access point to the external network and the individual network nodes.
Protection from attacks coming from LAN access points
Regarding the first point, the router chosen in the previous chapter does not just unpack data down to IP to redirect it, but fully strips it down to layer 7 to compare it with known malicious packets, in order to block a potential intrusion at the root of the LAN.
The LAN segmentation mentioned above also contributes to this purpose.
Another vulnerability point from this perspective is certainly user access via VPN; the communication protocol is encrypted and secure, but the risk is that users themselves do not properly store the access key, allowing third parties to access. For this reason it is absolutely necessary to use some form of Multi-Factor Authentication, to drastically lower the probability of this kind of attack (even with the password, access is impossible without the second factor).
Protection from infection of an internal network node
As for protection on individual nodes (e.g. the case where a user connects an infected USB stick) it is necessary to install an antivirus. There are two types:
- Signature Based Antivirus: the old-school antivirus behavior and is based on a large list of hashes corresponding to known infected files. In practice it checks whether among the device’s files there is one whose hash matches one of the known hashes, and in that case the infection alarm triggers. The problem with this approach is obviously that if the attacker changes even a single bit of the malicious file, the hash will be different and the infection will not be identified.
- Behavior Based: the behavior of next-generation antivirus. Instead of relying on comparisons with known vulnerabilities, it analyzes the behavior of processes on the system. If a process starts performing strange and incoherent behaviors, it is stopped instantly and the computer running the process is excluded from the network, so it cannot infect the server.
One option could be to subscribe to Microsoft 365 Business Premium, obtaining both Behavior Based Windows Defender for the 4 clients + server, and all other Office services, if needed. In this case, the annual price is about \(350\text{€}/\text{year}\). Another option at the same price is Sophos Intercept X Advanced, which however does not include Microsoft’s Office features.
Theoretically, another precaution to limit the possibility of infection of a network node is to respect the Least Privilege principle: users must have the minimum number of system permissions needed to comfortably perform their activities. There is no need for users to work on an Admin profile, they can do everything on User profiles which, in case of infection, make it harder for the attacker to access sensitive system resources due to lack of permissions. Admin accounts will be used only in case of intentional system changes.
In any case, considering also the annual antivirus expense together with the other components, we have reached a price of \(4.445\text{€}\).
Data backup systems
The RAID1, analyzed in the first chapter, is not a form of backup. RAID1 improves system availability, mitigating the impact of any SSD damage, but if an intruder enters the server and deletes data from one disk, the change will also occur on the second.
The only way to protect against this danger is to perform real backups. Ideally, the most solid method is to follow the 3-2-1-1-0 rule:
- 3 copies of the data: original + 1 copy is not enough. Statistically, if you have only 1 backup, there is a non-zero probability that the backup is corrupted on the day you need it. With 3 copies (1 Production + 2 Backups), the probability of simultaneous failure tends to zero.
- 2 different media: do not keep everything on disks of the same type. If a firmware bug hits Samsung SSDs, we could lose everything. Here we use: SSD (Server) and mechanical HDDs (NAS, as we will see shortly).
- 1 off-site copy: data must physically leave the office. If there is a fire, flooding, or physical theft (thieves taking away Server and NAS), local data is lost. You need Cloud or a disk to take home.
- 1 immutable copy: the backup, once written, is “locked” at the file system or API level. Nobody can delete or modify it for a set time (e.g. 30 days), not even the administrator.
- 0 errors: backups must be tested. A backup you have never tried to restore is just a useless file that takes up space (Schrödinger’s backup).
One way to implement this could be to divide the architecture into backup layers:
- Layer A: Production (The Dell Server): the first level of “backup” is the DELL server. Here it is possible to enable a Windows Server feature called “Volume Shadow Copy”, which takes a “snapshot” of the disk twice a day (e.g. 12:00 and 18:00). This way, if a user overwrites an Excel file by mistake, they can do Right Click -> Properties -> Previous Versions and recover it on their own quickly. It is not a real backup (it is on the same disk), but it is very convenient.
- Layer B: Fast Backup (The Synology NAS): consists of a NAS placed in another room or in a locked cabinet, connected via the LAN. The NAS must not be a “shared folder” accessible from Windows (otherwise any ransomware encrypts that too). The NAS must “pull” the data to itself. To do this, a specific software is used (Active Backup for Business - ABB): on the Dell Server we install a small “agent”. The NAS connects to the Server and downloads the entire system image (Bare Metal). This way, if the Dell Server dies (e.g. motherboard burned), you can restart immediately by replacing the machine and copying the entire backed-up image to it or by using Synology NAS functionality, which can boot a virtual machine that is an exact copy of the server in a few minutes, allowing work to continue while waiting for the new server.
- Layer C: Disaster Recovery & Immutability (The Cloud): in the worst case where thieves come in and steal Server and NAS, the backups hypothesized so far are useless. The solution is Immutable Cloud: the NAS takes the backups made during the night and sends an encrypted copy to a Cloud (e.g. Synology C2). By configuring the Cloud in “Governance” or “Compliance” mode, when the backup file is uploaded to the Cloud, a “time lock” is applied to it (e.g. 30 days). This way, if the apocalyptic scenario happens where the hacker enters the network, encrypts the Server, discovers the NAS password, enters the NAS and deletes all local backups and then also tries to delete the backups on the Cloud to ask for ransom (this hacker must be very motivated), the Cloud responds: “Error: I do not know you”. The hacker cannot delete them, even if they have the password. It is mathematically locked.
Since we are in a small firm, this last level C can probably be replaced by a simple offline copy of the data, which can be taken home when leaving the office.
To implement all this, the necessary expenses would be:
- NAS Synology DS224+, cost \(381\text{€}\);
- Disks Seagate IronWolf, cost \(2*126=252\text{€}\).
The overall architecture price so far is therefore \(5.078\text{€}\).
The clients
For client PCs we could also go used and save a lot, since most of the work will be done by the server. However, in this case I was asked to target the new market for a future-proof approach.
Another request that was made is the possibility to work remotely: ideally each user should have a desktop and a laptop. However, this “double machine” approach for each user has several drawbacks:
- considering a budget of 1200 euros for each user, if we take two machines we will have to settle for two cheap devices, which then will play exactly the same role. If instead we buy a single laptop, we can spend the entire budget to get maximum quality and performance.
- with two machines for each user you would have 8 server access licenses to pay (if you use per-device licensing), and double the machines to pay for and manage antivirus and software updates.
The best solution in my opinion is therefore to buy only high-quality laptops, combined with a docking station that allows “turning them into desktop computers” once you arrive at the office.
For the single workstation, I assume the following configuration (I refer to HP products because in this case they seemed the best value for money):
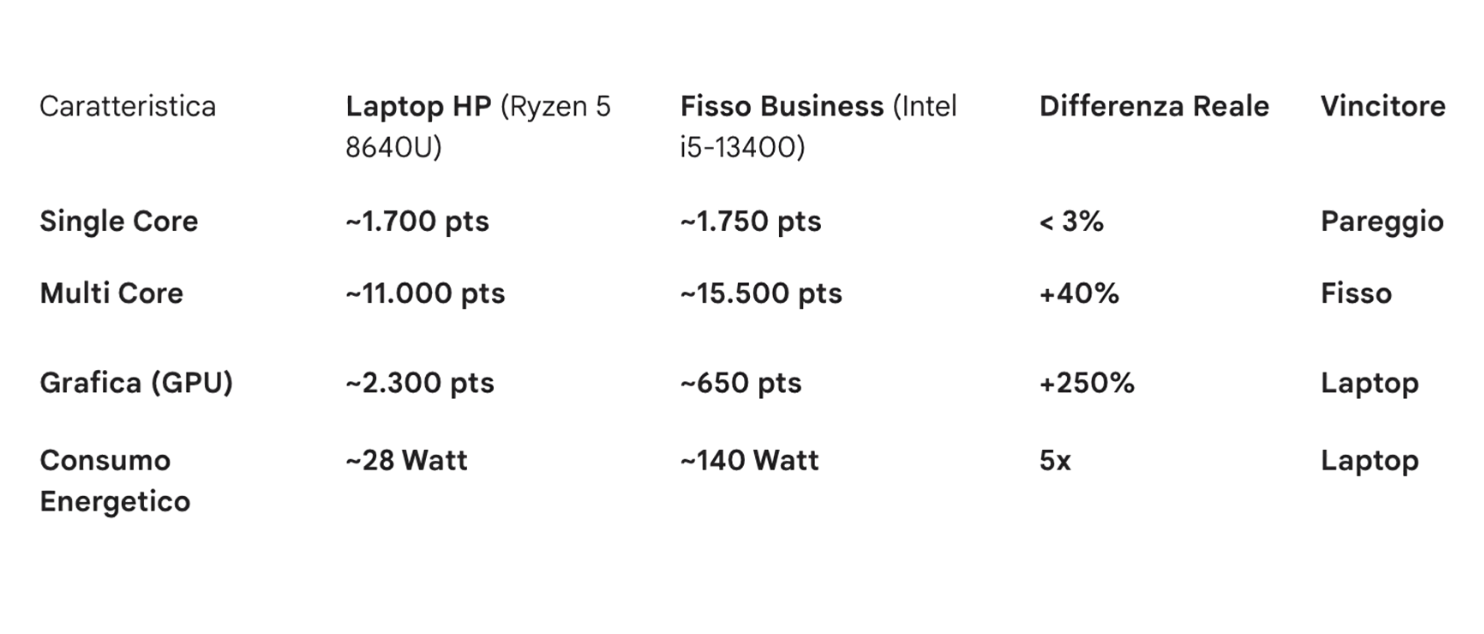
- Computer: HP EliteBook 8 G1a 16-inch or HP EliteBook 8 G1a 14-inch depending on whether the user prefers more screen space to work or better portability. The price per unit is \(1.074\text{€}\). To be even more convinced that buying a top laptop is better than a mid desktop, we can analyze the following table, which compares the chosen laptop with the desktop previously included in a provisional quote of the project (benchmarks used are Cinebench R23 and 3DMark Time Spy).
- Docking station: the user must be free to carry work wherever they want, but have the ability to return to their fixed, stable, and comfortable workstation. For this, we will include for each notebook an HP USB-C Docking Station costing \(167\text{€}*4=668\text{€}\). This way it is possible to switch from laptop setup to desktop setup by simply connecting a USB-C cable, which will provide access to power, display (one or more), printers, external drives, wired network, …
- Monitor: the chosen laptop display is excellent on the go, but not good for daily work sessions, where a larger size is needed. For this reason one or more external monitors will be connected to the docking station. As for this aspect, the situation to adapt the project to is the following:
- there is already a good monitor for one workstation, and also a good webcam. We will therefore buy the monitors for the other 3 workstations;
- two of the workstations will also be used for in-person client interviews, so we want to adapt them for that purpose;
- 3 workstations must have a webcam, one can do without.
Given these constraints, my idea is:
- leave one workstation as it is (with the monitor already present). No additional webcams, speakers, or microphones are needed since the workstation is not focused on multimedia and the laptop’s excellent microphones, webcam, and speakers are more than sufficient for work content.
- for the second workstation, buy a Lenovo L27i-4A 27” Monitor with integrated speakers (price \(160\text{€}\)). We will omit a dedicated webcam for this workstation since there is already an excellent Microsoft webcam in the company, and the laptop webcam and microphone are also available anyway.
- for each of the two workstations for direct client interaction, we will buy:
- a articulated hinge arm for dual monitors (the one in the link supports up to \(9kg\), the monitors we will choose weigh \(3.5\) each) at about \(30\text{€}\). This way, when you want to show something to the client sitting on the other side of the desk, it will be enough to rotate a monitor and enable display mirroring. The hinge will be assisted by …
- … two more Lenovo L27i-4A 27” Monitors (\(2*160\text{€}=320\text{€}\)).
- in this case, each workstation also needs a webcam. Instead of buying a monitor with an integrated webcam, which would have thickened the bezels of one display, made the screens unequal (inconvenient since it will be used in dual-screen mode) and would have condemned the user to mediocre capture quality, I prefer a dedicated webcam: the Logitech Brio 500 (\(82\text{€}\)). This camera has an integrated privacy cover, a noise-reducing microphone, excellent video quality and adjustable angle. It is also small, elegant, and fits the thin bezels of the chosen displays.
The total price for the two “direct interaction” workstations is \(864\text{€}\).
The total “clients price” is therefore \(1.074\text{€}*4+668\text{€}+160\text{€}+864\text{€}=5.988\text{€}\).
If we also wanted to add input peripherals we could choose something cheap but practical and elegant, like a Logitech MK295, priced at \(30\text{€}*4=120\text{€}\). Being wireless and able to connect both mouse and keyboard with a single USB, we minimize the number of ports occupied on the docking station and the number of cables on the desk.
The total spending so far is \(5.988\text{€}+5.078\text{€}+120\text{€}=11.178\text{€}\).
UPS - Uninterruptible Power Supply
We have spent \(11.178\text{€}\), it would be a shame if a power surge or a lightning strike burned everything in an instant. For this reason, it is important to install a UPS network in our architecture as well. Let’s study a smart approach below.
UPS for clients
Let’s start with the easy part: clients. In our implementation we are using laptops, which therefore have an integrated battery. This means that even if power goes out, the computers would have at least 4 hours of autonomy to calmly finish work and save. Here the things we must protect from the “blackout danger” are the USB dock and the monitors.
As for other devices (e.g. printers), I do not recommend connecting them to the UPS since they are not essential devices and would reduce autonomy for the truly indispensable devices.
Let’s do a small calculation of the consumption of the devices the UPS must support, both in the “normal” case and in the “worst” case:
- Normal consumption: since the PC is “always connected” to the dock, and therefore probably at 100% battery at the time of the blackout, it will draw very little power from the outlet. To stay conservative, let’s assume a consumption of \(40-60 \text{Watt}\). Let’s also consider the worst case of workstations with two displays: their total consumption would be \(17.5 \text{Watt}*2=35\text{Watt}\). In total we have \(80-90 \text{Watt}\).
- Worst case: if instead we are in the situation where the laptop is completely discharged and draws all \(100\text{Watt}\) provided by the docking station, total consumption would be around \(140-150 \text{Watt}\).
We need UPS units able to keep the workstation active for about fifteen minutes at full load, so we can calmly close work and save correctly.
A smart choice could be to buy APC ES BE850G2 (price \(138\text{€}*4=552\text{€}\)) with 8 Schuko outlets directly on the UPS body, to minimize the number of cables under the desk (no power strips needed, everything connects directly to the UPS). It is also possible to route the ethernet connection directly through the UPS, to protect the computer from any lightning discharge carried by that cable, and also connect the UPS to the computer in this way to set automatic Windows shutdown when the battery reaches a certain minimum threshold.
The manufacturer-indicated characteristics are those shown in the figure below (BE850G2).
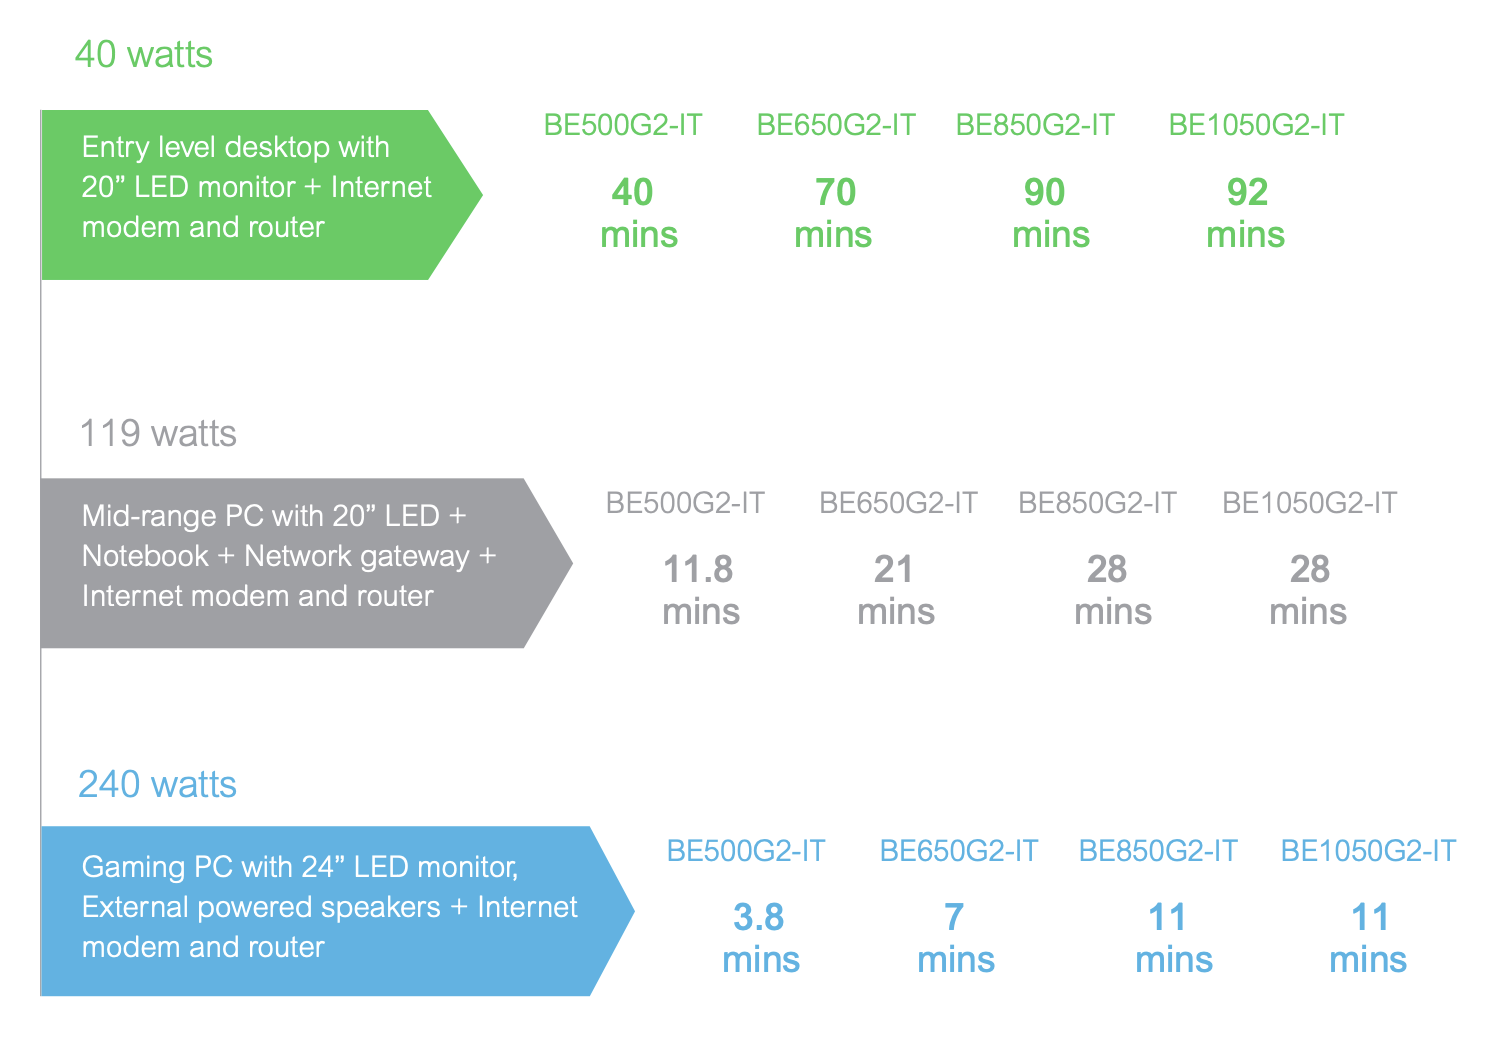
The estimates are probably optimistic, but it is realistic to expect a 50-minute autonomy in the “normal” case and about twenty minutes in the “worst” case. I think it is compatible with our goals.
UPS for the server
Due to some odd European regulations, servers sold in Europe must have super efficient power supplies (silver category), even if you buy only one. This type of power supply expects a perfect sine wave as input, while most UPS units provide current as a square wave. This incompatibility would generate an abrupt shutdown of Server + UPS, which we absolutely do not want.
For this reason, we must turn to more expensive devices, specific to this case.
Let’s also calculate consumption in this case:
- Server:
- NAS Synology DS224+ (2x HDD IronWolf): about \(20 W\).
- Router Ubiquiti UDM-Pro: let’s consider an average consumption of \(33 W\).
- Switch Ubiquiti USW-24-PoE: \(40 W\).
To be conservative, let’s consider a total average consumption of \(200W\) with peaks of \(400W\).
If we took the CyberPower CP1600EPFCLCD (price \(363\text{€}\)) we would have:
- Normal scenario (200 Watt): estimated autonomy of about \(22-25\) minutes.
- Peak scenario (400 Watt): estimated autonomy of about \(9-11\) minutes.
The total price of the UPS section would be \(552\text{€}+363\text{€}=925\text{€}\). The overall architecture price so far is \(925\text{€}+11.178\text{€}=12.103\text{€}\).
Operating system and licenses
The business software used in the office under analysis requires Windows Server, with the respective license. However, that license covers only the server and does not grant users the right to connect. To connect, you need an entry ticket called a CAL (Client Access License).
There are two types of CAL:
- User CAL (Per person): a user can access the server from as many devices as they want (office PC, laptop at home, smartphone). It is probably the recommended one in this case, so users can connect both from the local device and from the laptop remotely.
- Device CAL (Per device): a device (e.g. the reception PC) can access the server, whoever uses it.
Technical note: User CALs for Windows Server “Standard” are not technically installed on the server (there is no counter that blocks you). They are “pieces of paper” (Honor Based). But if the financial police show up and you have 10 users and 0 CALs, you are in trouble.
There are two versions of Windows Server currently used:
- 2022: stable, tested, and compatible with everything created for Windows Server up to now;
- 2025: just released, with interesting cloud-related features (not fundamental in this architecture) but with possible compatibility problems (e.g. with the NAS).
The best option is certainly to run Windows Server 2022 in our office, but it is possible to do so either by buying Windows Server 2022 licenses or Windows Server 2025 licenses. Which to buy?
- Case 1: buy 2022 licenses: you can buy the server license here (\(521\text{€}\)) and the user one here (pack for 5 users at \(269\text{€}\)). In this case the system would be supported until 14 October 2031, and the total price would be \(790\text{€}\).
- Case 2: buy 2025 licenses: you can buy the server license here (\(925\text{€}\)) and the user one here (pack for 5 users at \(287\text{€}\)). Microsoft allows you to buy the 2025 license but install the 2022 version, and that is what would be done in this case for compatibility reasons. The only tangible advantage for the firm would be extended support until \(2.034/35\), at a total cost of \(1.212\text{€}\). That is \(422\text{€}\) more: it might make sense, it is not obvious.
The overall infrastructure price in the two cases is:
- WS2022: \(12.103\text{€}+790\text{€}=12.893\text{€}\);
- WS2025: \(12.103\text{€}+1.212\text{€}=13.315\text{€}\).
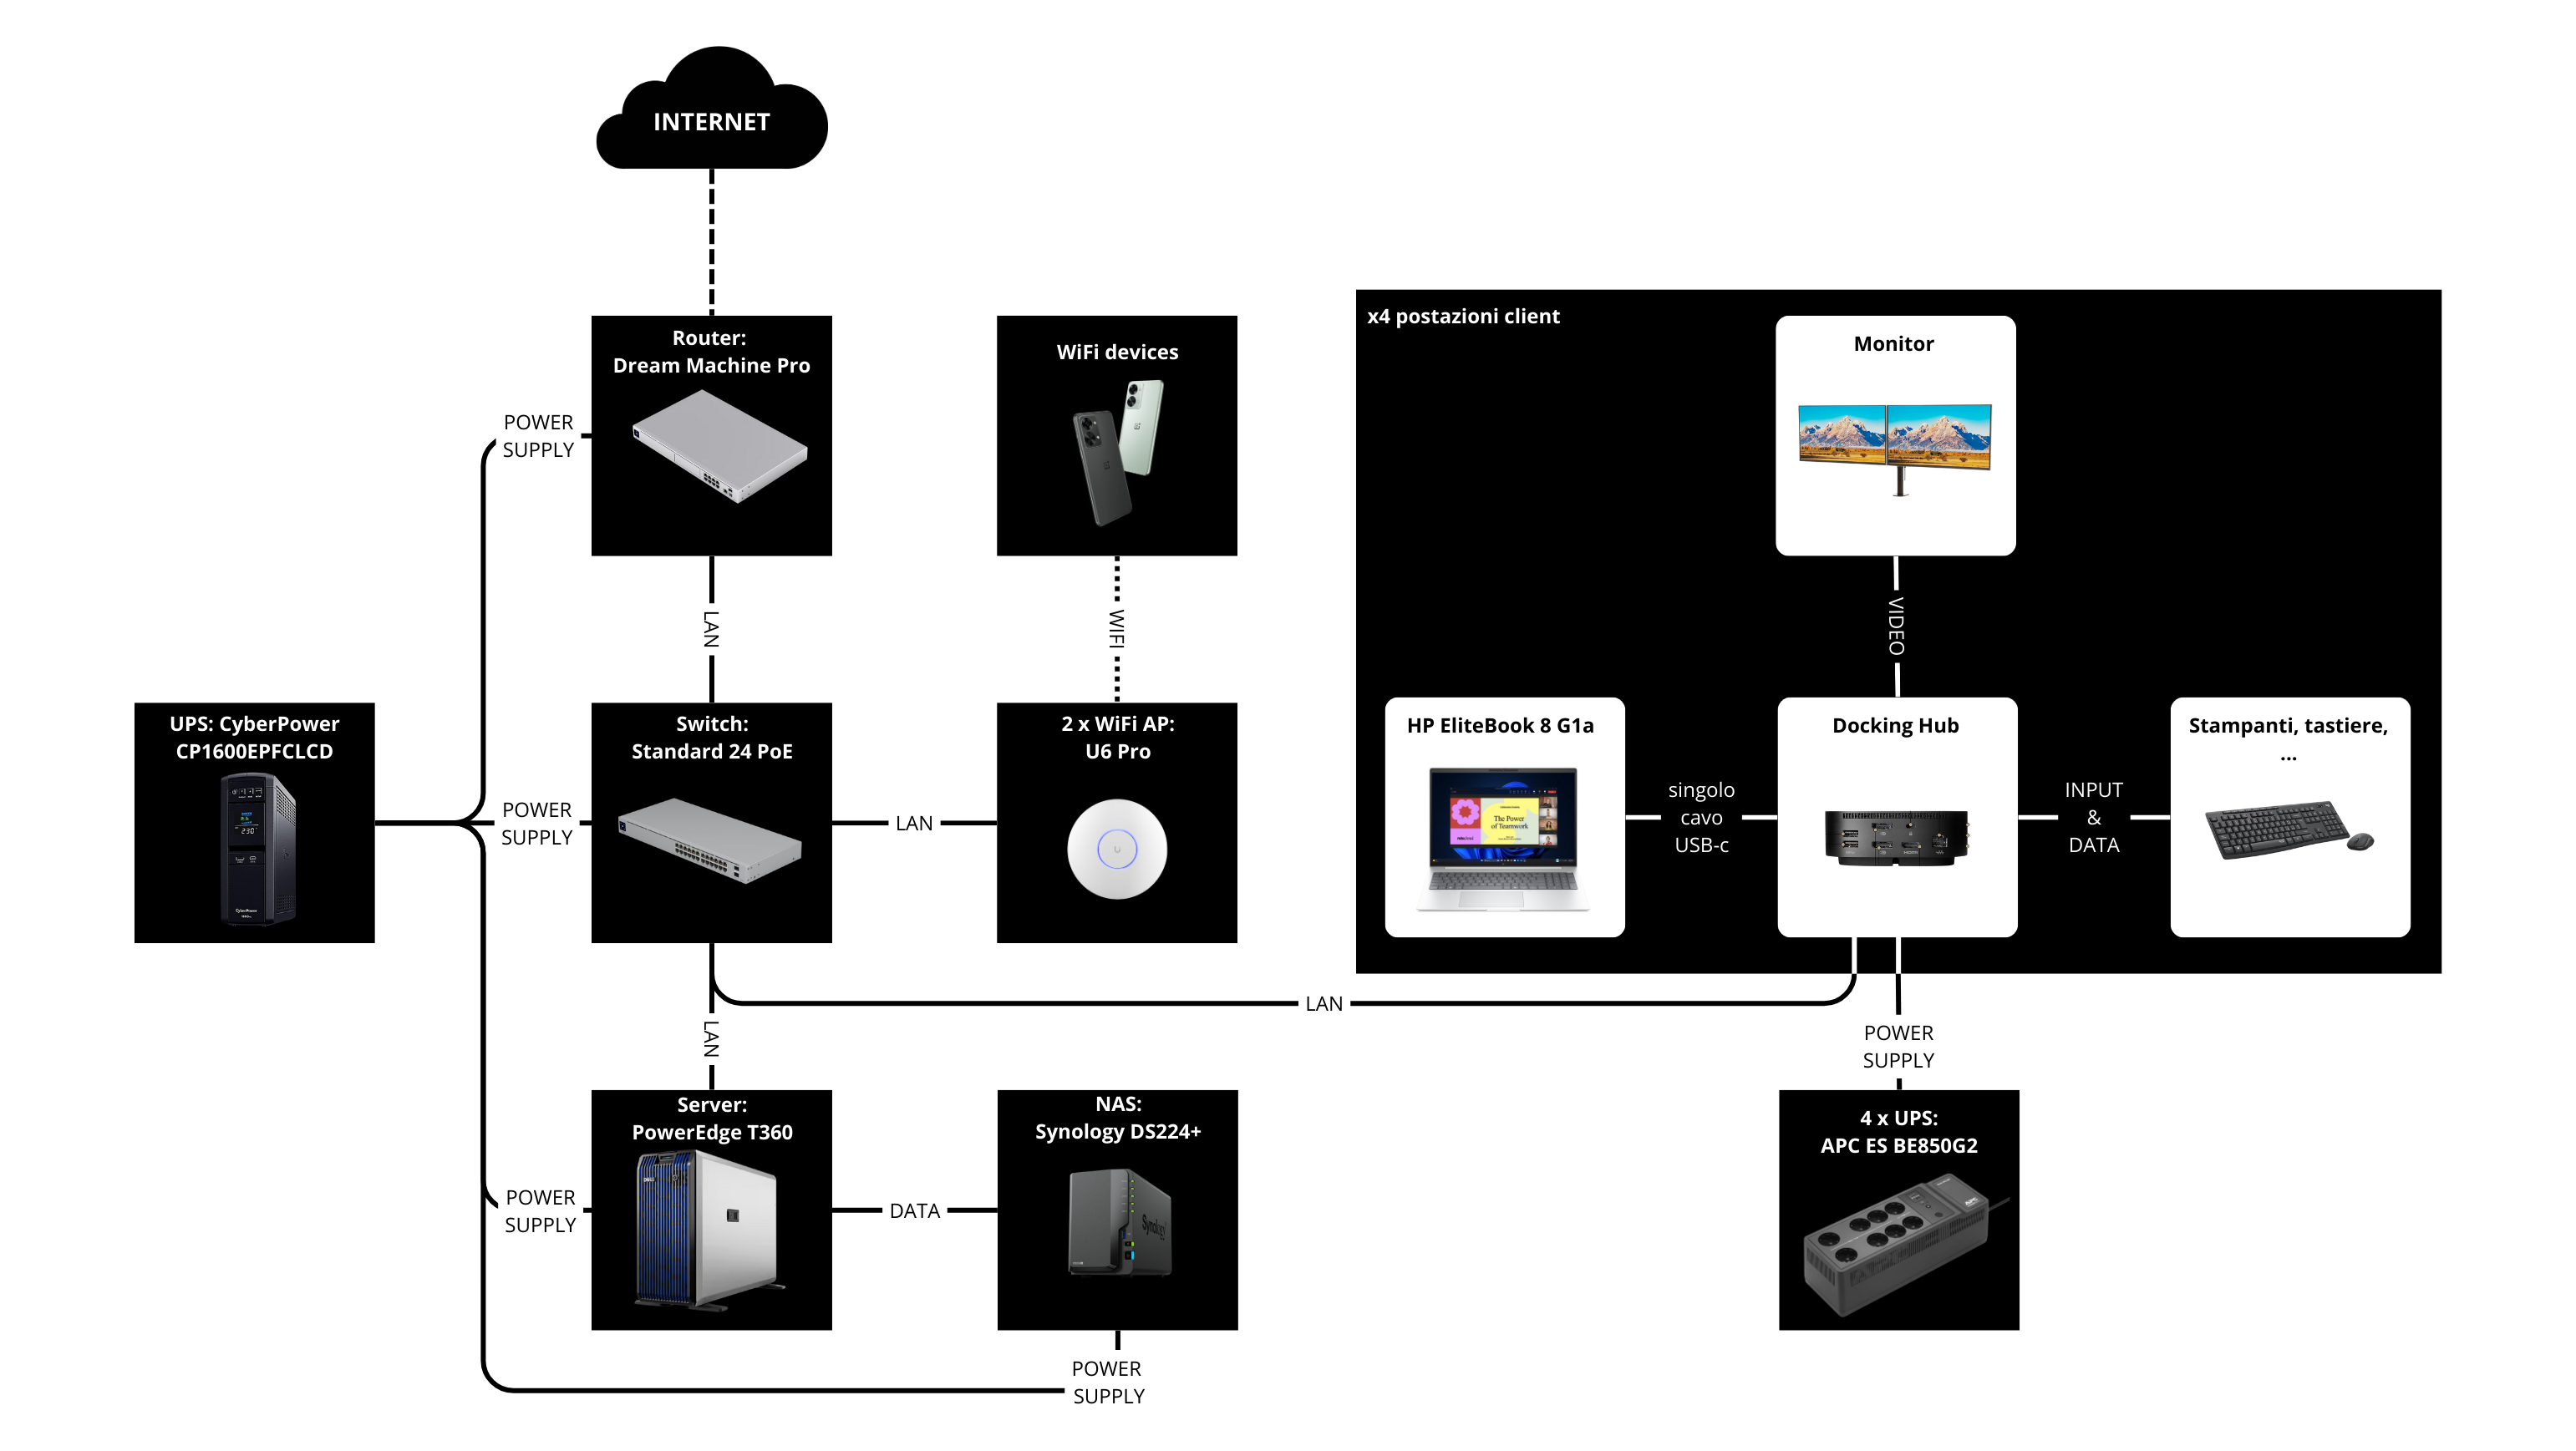
Final diagram
We can finally redraw the diagram seen at the beginning of the article, inserting the components actually used.